
What’s up With Computer Audio, Digital Download, & Home Audio Servers?
An Audio Artisans Primer to Understanding All Things Digital Audio
Digital Audio is a fairly new thing in the Audio World. Right now, there’s a lot of information out there, and not a really great way to figure it all out. I’ve tried to compile a bunch of that information here in order to make a comprehensive guide, with links, to help others understand what this is all about. Keep in mind this in not intended to be the ultimate in guides, simply the beginning of understanding.
Why Should I Consider Digital Audio? Good Question. Do you really love high quality music that makes you feel like the performers are playing in the room directly to you? Are you interested in a fun and simple way to explore your collection? Do you have tons of CD’s that you can’t even begin to keep track of? If you answered yes to any of these questions, then you might consider looking further into Digital Audio. Digital Audio offers a convenient, fun, and interactive way to sort, view, and explore your music collection. Usually control and browsing is done on a tablet, like an iPad or Android device, using a list of album covers to visually browse, and giving you the option to sort your albums in a wide variety of ways. Digital audio also offers high quality, better than CD’s in most cases, and even offering master tape quality recordings, for that “in the studio” perfection. The potential for Digital Audio is great right now. But what does it take to make that happen for me?
The Components: At it’s most basic, the concept of computer audio isn’t that far afield from what we’re already familiar with, it’s just that it sounds scary, because it’s all digital, and we have a whole bunch of new acronyms that make it sound more complex. Here’s what you need: A Server, a DAC, and some Audio Files. What’re those? Audio Files are easy. They can be audio tracks that you’ve extracted or “ripped” from a CD that you purchased, or tracks/albums that you purchased and downloaded from HDTracks, from the iTunes store, or most of the links at the bottom of this article. Usually Audio Files are stored on a Hard-drive, which can be on a local computer or server, in an enclosed chassis with a USB interface, or what we call a NAS drive, or Network Attached Storage device, which is essentially a hard drive that sits on your home network and is accessable from anywhere on the Local Area Network (LAN). The Server is essentially a music manager, and can be anything from a desktop computer, or laptop running Windows or Mac OS, to a dedicated unit running it’s own software which simply interfaces with all those Audio Files that you have, arranges them in such a way making it easy for you, the user, to find things, giveing you the ability to search and control it, usually from an iPad, or other tablet app, and processes the information by sending it to a DAC. The DAC (Digital Audio Converter) takes that information, which is still just digital 1’s and 0’s and converts it to an analog signal that can be run into any home Audio system. Think about it like a CD Player. You have a CD, which contains Digital Files (a CD is ultimately a Digital Storage Medium), you place it into a CD Player which reads that information and converts it using it’s own internal DAC into something that can be amplified through your audio equipment. It’s the same basic concept, except in a lot of cases with computer audio, we just separate out all the components instead of having one complete box. Some commercially available servers offer a complete solution, and include it’s own Management, Hard Drive Storage and DAC. Systems like Aurender or Meridian Streaming do just that. Other Servers merely contain the DAC and require storage of the Audio Files to be separate, such as the Lumin. While still others, are simply an interface, requiring all other elements to be separate, both Storage and DAC, which is more typical of what you would get when you use a Computer or a Laptop to manage your music. In this case, you’d get a computer running your preferred Operating System, Windows or Mac OS, choose an appropriate software like JRiver Media Center, or Amarra, You can store your audio either locally on the computer itself, on a USB Attached Hard-Drive, or a Network Attached Drive, then you export the music out to an external DAC like the Ayre CODEX, the AQ Dragonfly or the Primare DAC30 via USB, Toslink, Coax, or AES, then connect the analog interconnects, either balanced or single-ended into your audio processor and you’ve got your basic setup. Now there’s more to do to get the most out of your system, but I won’t go into depth, as there’s a couple resources that have already written in-depth guides to this. For more in-depth information, explore the Links Below.
File Formats & Meta-Data: So you’ve probably seen these audio file extensions, like .MP3, AAC, .WAV, .FLAC or otherwise. Each of these represents a different type of file format with different audio properties. .MP3 is one of the most common, and is really used for compression of music files for small size, and ease of transport, ie. thousands of songs on an iPod. .AAC is the native Apple iTunes audio format. Both of these are considered to be “lossy” formats, or compressed formats, meaning that they reduce the quality of the audio file in order to make them small and convenient. They’re not recommended if audio quality is what you’re going for. What we want to focus on are the formats that offer higher quality, among those the most common are .WAV, .FLAC, and ALAC, because they’re considered to be “Lossless” or without any quality loss to the original audio file. There’s a lot of dispute as to which is the best, so I’ll give you the basic rundown and encourage you to try them for yourself to determine your preferred format. .WAV is arguably the most accurate from a standpoint of file conversion, as there’s no compression of the information whatsoever. The problem with .WAV is it also does not carry Meta-Data, which we’ll talk about in a little bit. .FLAC does carry meta-data information, but uses a compression algorithm to reorganize the file information for storage purposes, then un-compresses the music for playback, leaving the ultimate product untouched. One problem with FLAC is that native iTunes does not support it, and since iTunes is the single most popular media manager in the world, many people don’t use FLAC. iTunes aside, FLAC is considered to be an industry standard, and is supported by almost every other device out there. ALAC or “Apple Lossless” delivered with the .M4A extension, is Apple’s answer to FLAC, and handles the music in a very similar fashion to FLAC, and is accessible across multiple Apple platforms. Because it was developed for Apple products, it was designed with battery conservation during decompression in mind, hence better on mobile devices. Like FLAC, ALAC also carries Meta-Data information. To many people the audible difference between these is virtually imperceptible, and ultimately is up to you, the user as to which you prefer.
We mentioned Meta-Data. What’s Meta-Data? Meta-data is a fancy way of encapsulating all the information about an audio track, such as artist(s), album, genre, year, record label, composer, producer, cover art, etc. Anything you can think of can be associated with meta-data. This is one of the features of Digital Audio, since with good meta-data information attached to a track, it allows you to search, organize or filter your albums in a very quick and simple way. For example, I can be looking at an album by one artist, look to see who produced it, and with a single click or touch, I can see what other albums I have (or that I don’t have, but SHOULD) that the same person produced.
24/96…16/44.1…The Numbers. What do they mean? These numbers are almost always associated with Digital Audio tracks. There’s science involved here, so I’ll try to boil it down quick for you and not be boring. First we need to understand a little bit about the nature of sound. Sound is an analog energy wave that travels along until it reaches our ear, at which point our eardrum vibrates at the same frequency as the incoming wave, (Protip: You can buy and upgrade electronic equipment, speakers and the like many times in your life, but the only pair of ears you’ll ever own are the ones you were born with. Invest in a pair of earplugs.) transmitting those vibrations to our brain which then translates this energy into what we recognize as sound, defining pitch, key, tone, etc. The larger and longer the wavelength, our brain interprets as low end, or bass frequencies, where as the shorter and faster the wavelength, we interpret as higher frequencies. Bottom line: we hear in Analog, not in digital. But these days, almost everything from movies to music is recorded in Digital, so what is the necessary process to take that naturally produced analog wave, capture it digitally and then reproduce it once again as an Analog wave, hopefully as close to the original as possible? That’s where these numbers come in. They’re essentially a digital representation of an analog wave. The first number, which is usually either 16 or 24 Bit, (or in some rarer cases 18, and up to 32). This number is commonly known as the “Bit Depth”, which defines for us the range of amplitude available while recording. Each time the recording device takes a snapshot (“sample”) of the analog wave, it takes an image of that waves amplitude in Db (Decibels). 1 Bit = 6 DB. Higher bit depth provides more possible amplitude values, producing greater dynamic range, a lower noise floor, and higher fidelity. Think of it like the marks on a ruler, more measuring points means more accurate measurements. How many times does it sample the analog sound wave? That’s where the second number comes in. The second number which is commonly 44.1, 48, 88.2, 96, or even 192 is followed by the kHz, which as you probably already know is kilohertz, so 44.1kHz=44,100Hz. This is the amount of times in a second that the digital recording device samples the analog wave, essentially modeling the analog wave form in a digital representation. It’s defined as kHz because this number also represents the frequency range at which it can reproduce. Hence, more snapshots of the wave equals a closer approximation to the original analog wave. So, in the case of a CD (which is a 16/44.1 medium), every second of music you hear the amplitude of the wave has been sampled 44,100 times with a 96Db dynamic range (16 x 6=96), and a frequency range of 0-22,050Hz (remember a sound waves properties include both a longitudinal and transverse wave, each with a range of 0-22,050. When you add the wavelengths together you get 44,100). Logically, a higher sample-rate, means a smoother, closer to analog reproduction of a wave.
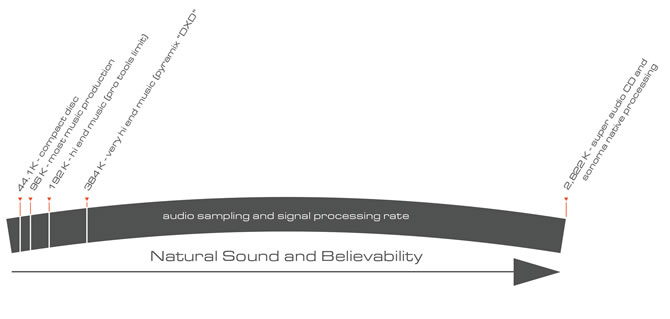
Image Courtesy of AcousticSounds.com
DSD: What’s that? DSD (Direct Stream Digital) is another thing that we’ve been hearing about, but what is it and is it actually better? In the previous section we were talking about Analog and Digital and how sound waves work. When Recording, the representation of the analog wave captured in a digital form is done via a process called Pulse-Code Modulation (PCM) wherein the amplitude of the analog signal is sampled regularly at uniform intervals, and each sample is quantized to the nearest value within a range of digital steps. The PCM signal now represents the analog wave using two properties, the Sample rate and the Bit-Depth, as discussed in the previous section. This is how most CD’s are made. DSD is an alternative to this process developed by Sony/Philips when developing the SACD format. It samples at 2.82 mHz, which is 64 times the standard CD 44.1 kHz sample rate. The Bit Depth is very different, as DSD actually uses a 1 bit scale, but uses a technique called Noise Shaping to reduce the noise induced by 1 Bit inaccuracies. This leads to a very low amount of noise in the frequency spectrum that we listen in, but also produces a high amount of noise induced into the extremely high frequencies, especially in the 20 kHz and above, which is outside of the range of human hearing. Also, because of the 1Bit depth, it makes it very difficult to edit from an engineering and mastering standpoint, so frequently, DSD is converted to PCM for editing, then reconverted back into DSD for the final distribution (either as a download or an SACD). Sometimes this conversion uses a process called DXD, which is a 24/352.8 kHz PCM conversion process for DSD. This isn’t common, but you can purchase discs specifically advertising the DXD conversion process. Based on this text, you might think DSD sounds like an awful thing, but really, due to the fact that it’s almost a completely different approach from PCM, it’s hard to compare the two from a standpoint of looking at numbers and charts, and at the end of the day, the process produces a very fine sound, considered by many to be the best sound possible from a digital format. Mind you, DSD in it’s native format requires specific hardware to decode, so if you’re interested in trying it out, make sure that your DAC has DSD processing. All that taken into account, is DSD better than a well processed, high quality PCM? Really that comes down to the listening, and to the individual ear. In the links below, there’s a DSD to PCM comparison with downloadable snippets of music in both formats so you can decide or yourself.
Additional Sources of Information:
Computer Audio Demystified by AudioQuest
Computer Audio Setup Guide by Audioquest
Computer Audio Overview by Ayre Acoustics
DSD vs PCM by Ayre Acoustics
NPR on High Res Audio
An Opinion on DSD: John Siau
An Opinion of DSD: Andreas Koch
How the Human Ear Works
Adobe: Comparing Analog to Digital
16 Bit vs 24 Bit
Tweakhedz: 16 Bit vs 24 Bit
![]()
![]()
![]()
![]()
![]()
![]()
![]()